Water Kefir!

I am obsessed with all things fermented. I just recently woke up my kefir grains that were stored in the back of my fridge.  Pronounced KEE-FUR. I use to make it every couple of days- then I mastered kombucha which has a slower rhythm than kefir and just got into a comfortable pace….then I stopped drinking and my desire for beverages other than water crept up. Kombucha rolls around every 8-10 days and I have a pretty good rhythm going, when to make the brew while a finished brew is doing a 2nd ferment and I have cold kombucha in the fridge; kefir takes a short 2-3 days (!) and only a quick 2nd ferment, again about 1-2 days before its ready to go! I have been mixing mine with hibiscus tea, lemon juice, and drinking it on its own.

  • Water kefir is not the same as Dairy Kefir, it is also known as Tibicos and it is believed to have originated in Mexico.

Kefir is referred to as “grains” but they aren’t grains at all, but a living matrix of yeast and bacteria that look more like crystalline mini lumps. You can press them between your fingers and they will mush, I don’t know why you would want to do that, but that is the texture to them. I love these little guys. It has become such a pleasure to nurture them and to drink their gifts! They live off of sugar, so by the time they have eaten through the sugar in the water, mostly what is left is converted to glucose and fructose, and what you drink, has about as much sugar as one green apple. They are FILLED with healthy probiotics which helps promote a healthy belly. Water kefir is a fermented food that is easy to make and enjoy. You can also make an entirely sugar free non-dairy kefir drink by instead of using sugar water, you use raw, living coconut water and let that sit for a couple of days. The end result is almost a champagne like, mildly sweet, effervescent healing tonic!

Fermented foods are known for their anti-aging and cancer fighting properties. “Kefir also contains beneficial yeasts, such as Saccharomyces kefir, which can dominate, control and eliminate destructive pathogenic yeasts in the body. They do so by protecting the mucosal lining where unhealthy yeast and bacteria reside, forming an army that cleans up and strengthens your intestines.  The body becomes more efficient in resisting such pathogens as E. coli and intestinal parasites.” -www.tibicos.org

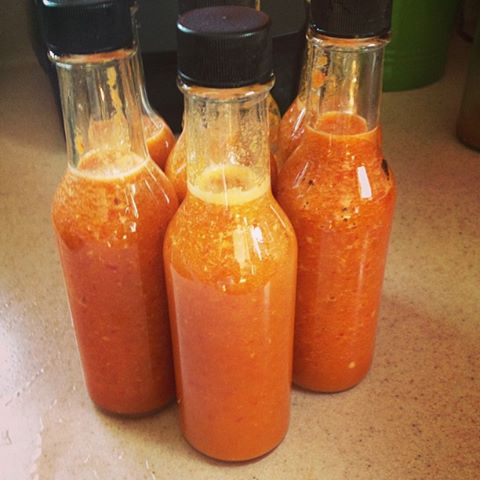
All it takes is about 48 hours before you are ready to enjoy your first batch of kefir.You can drink this liquid after straining out the grains (now ready for another fresh batch of sugar water) or you can opt to do a second ferment which creates more gas, creating a soda like drink. I love making mine fizzy, this happens by using an air tight bottle of some sort, like an italian swing top glass bottleGrolsch bottles or any hermetically sealed container. You can flavor it at this point with fruit juice, ,or fresh fruit, or with italian soda flavors- it really is like soda!  I find Water Kefir to be more accessible than kombucha initially but that could just be me.

You can’t grow kefir grains without having them! SO you either have to purchase them or be lucky enough to be given some. I am planning on having a kefir party soon but I am serious about my grains, don’t ask me for any unless you plan on committing to them! They are such a blessing!!!

The good news about kefir is that if you are not feeling it or start to get overwhelmed, you can put them in some sugar water and put them in the fridge for up to 3 weeks, where they will go to sleep (become less active) until you are ready to start them up again. Any longer than that, I would suggest dehydrating them.

What you will need to set up your Kefir Kitchen:

  • one or two 1 quart glass mason jars or bell jars (the grains don’t like metal and they shouldn’t ever come into contact with any stainless steel or other metal utensils)
  • 4-6 hermetically sealed bottles
  • fine mesh plastic strainers (get a set of several sizes)
  • sugar- they love sucanat but this makes for a heavier tasting brew, no honey (disinfectant qualities kills off the grains) no agave (low glycemic index), I use organic sugar, they LOVE it, it’s is really inexpensive, and makes a light tasting finished product.
  • cotton bandana- to cover the jar on the first ferment- the fermenting process needs air but the sugar water attracts ALL SORTS of critters, so you want to keep them from raiding your brew. (and yes those are SoulCycle Bandanas :> )
  • rubber band to secure the bandana around the lip of the jar.
  • one set of plastic measuring spoons

Basic Water Kefir:

1/4c water kefir grains

1/4 sugar

4c fresh water

1T dried fruit- I use Goji Berries and fresh ginger, but have tried figs (love), apricots, raisins (not a fan)- the grains LOVE dried fruit, and I notice it gets them more fizz lovin’ but it could just be me- you can choose leave them out entirely.

Dissolve the sugar in a clean glass mason jar- make sure that the water has cooled down if using warm/hot water to help dissolve the sugar crystals (don’t cook the kids!) Add in the grains, the dried fruit and cover with a clean cotton cloth and secure it with a rubber band. Let this sit in a place unmoved for 2 days away from direct sunlight…and on the 2nd day, get ready to rock your Kefir.

The grains will keep on keepin’ on as long as you care for them- feed them! If you notice your grains aren’t producing, or reproducing (which they will do and you get to be the revered sponsor to prospect-ful kefir makers of your choosing!), you can do a single feeding of molasses or sucanat, both of which are sugars with their minerals intact. This will give the grains a boost of nutrition, and then you can go back to your regular sugar water. Also adding a pinch of pink sea salt offers up perfect mineral nutrition.

I will post recipes as I make them. But one recipe to get you started is SO SIMPLE and probably my favorite…

Water Kefir Lemonade

4c 1st fermented water kefir (grains strained).

1/4c fresh lemon juice

Drink immediately! You can 2nd ferment the kefir after removing the grains for a couple of days and  then add the fresh lemon for a spikey, bubbly lemonade or fizzy Lemon soda!!!

THIS IS THHHHHEEEEEE BEST!!

Advertisement

Sundried Tomato & Ramp Cheese Spread

*sundried tomato & Ramp Cheese Spread

Seriously… NOT F*CKING AROUND….what a flavor on this cheese!!!! Ramps are only here for such a short time! What a way to celebrate their uniqueness and honor their presence. I had the opportunity to forage for ramps with my friend on her hillside- what a divine way to connect with the planet….spring has finally sprung.

Sundried Tomato & Ramp Cheese Spread

2c cashews, soaked for an hour (this step can be skipped)

1T mellow white miso

3 capsules vegan probiotics (empty powder and dispose of the capsule) or 1t powder

1/2c +up to 3T filtered water

2t onion powder

1/4c sundried tomatoes in oil- just the tomatoes, minced (I used Bionatura’s)

1/2t pink salt

1/4c coconut oil

3t lemon juice (omit if fresh is not available)

6 whole ramps, green & white minced

Step 1.

In a Vitamix or high-powered blender, add the cashews (drained if soaked), the probiotic powder, miso and 1/2c of water.

Blend this at a lower speed initially to well incorporate the contents, speed up the motor as it gets blended. You will need to process this for at least 4-5 minutes until the cashews are absolutely creamy. Scrape down the sides intermittently and be sure to get all possible ‘pieces’ of cashews blended into the mix. Add a T of water as needed if the mixture gets stuck. If you run this too fast, the contents will heat up, creating an oily mixture.

When totally creamy and smooth, remove to a glass or stainless steel bowl and set in a safe, warm place- I place mine in the dehydrator uncovered at about 100 degrees and let it run overnight. You could also in lieu of a dehydrator, place it in a warm spot in your kitchen, loosely covered. Leave this overnight or for 24 hours.

Step 2.

Mix in the salt, onion powder, sundried tomatoes, ramps, coconut oil (should be room temp and soft, not liquid), and lemon juice. Transfer to a container and place in the fridge for at least 6 hours to set, best, overnight. It becomes a beautiful, spreadable, creamy cheesy bit of awesomeness.

Smoked Cherry “the Bomb” Pepper Cheese Spread

Smoked Cherry Bomb Pepper Cheese Spread

Smoked Cherry Bomb Pepper Cheese Spread

2c cashews, soaked for an hour (this step can be skipped)

1T mellow white miso

3 capsules vegan probiotics (empty powder and dispose of the capsule) or 1t powder

1/2c +up to 3T filtered water

2t onion powder

1t heaping of smoked paprika or smoked chipotle powder

1T heaping of fermented Cherry Bomb Hot sauce or another type of raw hot sauce

1/2t pink salt

1/4c coconut oil

2t lemon juice (omit if fresh is not available)

4 scallions, green & white minced

Step 1.

In a Vitamix or high-powered blender, add the cashews (drained if soaked), the probiotic powder, miso and 1/2c of water.

Blend this at a lower speed initially to well incorporate the contents, speed up the motor as it gets blended. You will need to process this for at least 4-5 minutes until the cashews are absolutely creamy. Scrape down the sides intermittently and be sure to get all possible ‘pieces’ of cashews blended into the mix. Add a T of water as needed if the mixture gets stuck. If you run this too fast, the contents will heat up, creating an oily mixture.

When totally creamy and smooth, remove to a glass or stainless steel bowl and set in a safe, warm place- I place mine in the dehydrator uncovered at about 100 degrees and let it run overnight. You could also in lieu of a dehydrator, place it in a warm spot in your kitchen, loosley covered. Leave this overnight or for 24 hours.

Step 2.

Mix in the salt, onion powder, smoked paprika, hot sauce, coconut oil (should be room temp and soft, not liquid), lemon juice, and minced scallions. Transfer to a container and place in the fridge for at least 6 hours to set, best, overnight. It becomes a beautiful, spreadable, creamy cheesy bit of awesomeness.

Almond Kefir / Fermented Almond Milk

Almond Kefir/ Fermented Almond Milk

Almonds have an amazing nutritional profile, filled with protein, healthy fats, vitamins and minerals. This is an easy, digestible way to get them into your diet and benefit your gut health as well. Because it is cultured, it is filled with probiotics, amazing to fortify your digestive tract when taken daily. Start off with small doses in smoothies, about 1/4c to start. It is sour in nature and adds this amazing yogurt sort of lassi flavor that pairs incredibly well with fruits such as strawberries, pineapples, and mangoes. For a creamier milk, you can remove the skins…I am too busy to add the step, I do not mind the skins!

almond kefir
I keep mine in 2 cup ball jars for easy to measure to make 2 smoothies at one time. It is also easier to make different flavors with smaller portions!

1c raw almonds, sprouted (soaked overnight, drained)

8c water

4 capsules vegan probiotic, opened into the milk and stirred

In a blender, combine the nuts with the 1/3 of the water and blend until completely smooth. Add the remaining water and blend again until completely blended. Pour the cream though a nutmilk bag or through a fine mesh strainer into a glass pitcher or wide mout ball jar- discard the pulp or make use of it in smoothies, crackers etc.

Add in the probiotic and gently stir with a wood spoon. Cover with a cloth and place in a warm spot overnight to let the culture do its thing. When ready, the “kefir” will be under a layer of fatty almond cream- at this point you can separate the clearest liquid from the solids (Kefir) or you can combine it and use this for your smoothies (fermented almond milk). You can reserve about 1/4c of the kefir to use as a starter for your next batch, and you can continue to do so for 3-4 more batches.

The kefir can be flavored further. One of my favorites is to add orange slices and a little bit of sweetener and let that sit once again overnight- then refrigerated. This recipe can also be blended altogether and enjoyed as a orange creamsicle style smoothie.

Plain Sour Cashew Cream

Plain Sour Cashew Cream

Ummmmmm. It’s Sour Cream. SOUR CREAM. Just made out of cashews…not animal milk.

This. Makes me. Happy.I just had my hands on junky store bought vegan sour cream that was filled with crap. THIS..is not.

Hello Onion Dip, baked potatoes, plain yogurt, you get where I’m going….. Oh. And its RAW and filled with pro-biotics.

Plain Sour Cashew Cream

1c cashews, soaked for an hour (this step can be skipped)

5 capsules vegan probiotics (empty powder and dispose of the capsule) or 1t powder

3/4 +up to 3T filtered water

1/2t pink salt

1T lemon juice (omit if fresh is not available)

Step 1.

In a Vitamix or high-powered blender, add the cashews (drained if soaked), the probiotic powder, water.

Blend this at a lower speed initially to well incorporate the contents, speed up the motor as it gets blended. You will need to process this for at least 3-5 minutes until the cashews are absolutely creamy. Scrape down the sides intermittently and be sure to get all possible ‘pieces’ of cashews blended into the mix. Add a T of water as needed if the mixture gets stuck or if the mixture seems to thick. If you run this too fast, the contents will heat up, creating an oily mixture.

When totally creamy and smooth, remove to a glass or stainless steel bowl and set in a safe, warm place- I place mine in the dehydrator at about 100 degrees and let it run overnight. You could also in lieu of a dehydrator, place it in a warm spot in your kitchen, covered. Leave this overnight or for 24hours.

Step 2.

Mix in the salt and lemon juice. Transfer to a container and place in the fridge for at least 6 hours to set, best, overnight. If this set up thicker than desired, add a little bit of water to loosen it up to the desired consistency.

Kalamata Olive Cashew Cheese Spread- RAW, Fermented

kalamata olive cream cheese

Raw Kalamata Olive Cashew Cream Cheese Spread

This is a pro-biotic rich cheese! This would be AMAZING using pimento stuffed spanish olives! You could also add spices in like rosemary, basil, or fresh oregano- super delicious on bread, crackers , or with fresh veggies like celery dipped in.

1c raw cashews

1c raw sauerkraut (not pasteurized)

1T dulse flakes

1t raw agave or raw local honey

1 clove garlic

1/2t pink salt

3T of coconut oil

1T extra virgin olive oil

1/2c kalamata olives, divided

3-4T water- just enough to process until smooth- less is better!

Take 1/2 of the olives and mince with a sharp knife. Transfer and set aside in a mixing bowl.

In a blender, add in all of the ingredients, (including the other 1/2 of the olives) except the water and blend until totally creamy and smooth. Add the water as needed, 1T at a time. Pour into a jar with a locking lid (gasket, air sealed) and close it up.

Mix the minced olives into the cream cheese base. transfer to your container.

There should be at least 3 inches of space to give the cheese a chance to bloom. Label it, date it and place in a dark and warm place for 12-24 hours.

Transfer the jar into the refrigerator and allow to set up and cure for at least a week.

This is a pro-biotic rich cheese! This would be AMAZING with pimento stuffed spanish olives! You could also add spices in like rosemary, basil, or fresh oregano!

  • Delicious as a base for savory dips and spreads
  • Amazing spread on toast, bagels, and crackers

Raw Cherry Bomb Cashew Cheese

*cherrybomb Cashew cheese

Raw Cherry Bomb Cashew Cheese- Savory

1/2c raw cashews

1/2c raw sauerkraut (not pasteurized)

2t Dulse flakes

1t raw agave or raw local honey

1 clove garlic

1/2t pink salt

2T water

2T of coconut oil

2 cherry bomb peppers- destemmed

In a blender, add in all of the ingredients and blend until totally creamy and smooth. Pour into a jar with a locking lid (gasket, air sealed) and close it up. There should be at least 3 inches of space to give the cheese a chance to bloom. Label it, date it and place in a dark and warm place for 12-24 hours.

Transfer the jar into the refrigerator and leave it to set up and cure for at least a week.

This is a pro-biotic rich cheese!

  • Delicious as a base for savory dips and spreads
  • Amazing spread on toast, bagels, and crackers
  • Change the flavor by adding different peppers, herbs, olives, spices et

Fermented Hot Sauce!

*hot sauce

This stuff is BOMB. I started making it last year and could not wait for this summer to roll around to plant all of the peppers I could to make it again. SO SIMPLE. You can use any variety of hot peppers, I use a mix of Hot Cherry Bombs, Cayenne, Jalapeño, and Chili’s. Depending on the kind of heat you prefer, you could totes add Scotch Bonnets and Habañeros to the mix for a hotter hot or add some sweet peppers to make it more like a homemade Sriracha Sauce. I also add in some fresh ginger, garlic in addition to the salt in the brine. I eat it on sandwiches, with tofu, just about anywhere I want a little kick in the pants. SO. GOOD.

You Will Need:

  • A glass jar with a gasket lock-tite lid
  • 2-3″ piece of fresh ginger
  • 3-4 cloves of fresh garlic
  • *Salt
  • 3-4c prepared hot/sweet pepper mix, de-stemmed and at least split so that the brine can penetrate the pepper
  • *Brine: Mix 1 heaped tablespoon of a mineral rich good sea salt, like pink or celtic sea salt, per quart water.
  • a small dish to weigh the peppers down once the lid is sealed to keep them under the brine

Hot Sauce

In the clean glass jar, start layering the peppers, ginger and garlic in, tightly packing them and also pounding them in to crush them somewhat.
Layer them tightly! You can salt as you go or you can pre-mix your saltwater brine and pour over the pepper mix.
Leave about 2 inches of space from the top. I use a little porcelain ramekin and close it down with lid onto the peppers (do this over the sink so as not to let what spills out spill all over!)

All of the goodness should be completely submersed under the brine.

THATS’ IT! I put this in my dehydrator, not on, so it can do it’s thing in a safe, warm, undisturbed place for at least two weeks.

After several days you will see bubbles start to happen- Don’t open the jar! TWO WEEKS.

After two weeks, in the sink, because the contents are now under pressure, carefully open the jar- You will most definitely get a POP.

Pour this directly into your food processor or vita-mix and puree completely with ALL of the brine included. If you need more liquid, you can add a little bit of raw apple cider vinegar to the blender. Bottle and store refrigerated. AMAAAAAAZINGNESS.

*hotsauce