RAW COCONUT YOGURT

*raw yogurt

This is one of my most favorite foods of all time. I love food- It really doesn’t go well for me when I don’t like the food I am eating. Yogurt is one of those foods that historically has not translated well into being vegan, it’s just sort of weird. Whether its made from soy or nut milk, commercial vegan yogurt is really just not my favorite. It wasn’t until raw food school that I started to dabble in the fermented foods- we made yogurt out of coconuts…I wasn’t impressed, I mean I was, but not for the amount of work that went into making a cup of it….then I discovered raw frozen coconut meat. My sister Karen as per usual, started the entire family on the obsession, this time Raw Organic Vegan Yogurt. Made from literally 3 ingredients, ok 4 if you count water. This tastes like yogurt, but without that weird, sour dairy aftertaste….It’s so so simple, however, it may take a while to get into your awesome vegan yogurt groove. It’s almost imperative that you own a Vitamix or a heavy duty blender to get this done. In this post, I will be as transparent as possible with how I do this recipe simply because I’ve got it down. Feel free to add, change, and experiment with equipment, ingredients, etc and please, if you do, tell me how it goes.

WHAT I USE / ESSENTIALS:

  • 2 packages frozen coconut meat, thawed or / 2 pounds fresh meat (about 2 Young Thai coconuts)– don’t be trying to use the brown coconuts either, it’s not going to go well. Young Thai coconuts are soft, very soft. If you can’t find frozen coconut meat and you are super adept and ambitious and want to make it from scratch scratch, as in from the whole coconut, look up youtube videos on how to open up a coconut. You can use the water for the yogurt or drink it- it’s absolutely spectacular and depending upon the coconut, you may have more water than you will need for one recipe of yogurt.
  • 1 cup filtered water or raw coconut water– if you are using raw coconut water, you may want to adjust the sweetness from the sugar- coconut water is slightly sweet, when I use coconut water, I don’t even add sugar- I like the sour in contrast to fresh fruit (personal). Unless you have a source of raw coconut water, which many really don’t, use water. Even the coconut water that is claiming to be raw- isn’t, it’s treated with pressure which in turn, sort of cooking it. Coconut water in boxes is bullshit, it’s cooked and really is nothing more than sugar water without the vitamins, minerals and electrolytes touted- if you love the flavor then go ahead, otherwise, stick to plain water.
  • 2-4T coconut blossom sugar, raw agave, coconut crystals, maple syrup– I love the coconut blossom sugar, its still got many minerals intact, isn’t crazy sweet and it doesn’t discolor the final product where as the darker sweeteners may
  • 2 probiotic capsules- emptied or 1t probiotic powder– I use a vegan probiotic capsule- this is what kicks off the fermentation. I am sure you could use kombucha or kefir or some other starter but for me, the capsules offer clean, easy and consistent results and you are guaranteed  a ton of gut love in the process.
  • dehydrator– not essential but again, insures consistent results. I put the yogurt mix in and 6-12 hours later its a done deal. If I want it more tart, I leave it in longer. You can purchase a yogurt maker if you know that you want the vegan love in your life all day everyday, or invest in a  simple dehydrator if you think you may want to dry a banana or a mango from time to time. If you do not have a dehydrator, store the yogurt in a microwave, a cabinet, or somewhere that stays warm, it may take up to 3 days for it to ferment but it will work, just keep tasting it until it tastes as sour as you like.


HOW I DO:

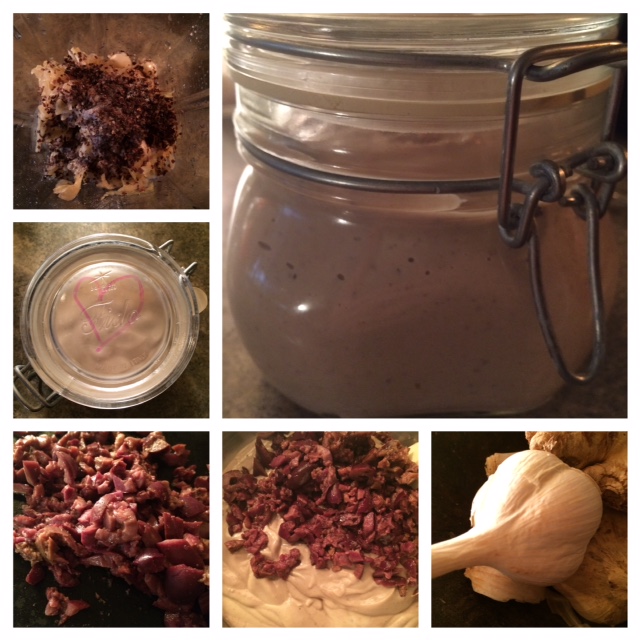
In the blender, add the meat , sugar if using and the water. Run it on low until the machine grabs it and starts blending it together then start to increase the speed. You may need the Vitamix plunger to help it along- you could add more water but I find that that messes with the end result, it actually tastes like a diluted version. Once you are at full speed, run it for at least 5 minutes or until completely smooth, no specks, bumps, nothing- smooth as velvet or cream. FIVE MINUTES, no less. This is where your average blender will most definitely crap out. Add the probiotics. Let run for another 30 seconds until incorporated.

Pour out of the blender into a container and cover it. I place it in the dehydrator, again, anywhere warm will do it just may take longer to turn.

You can play with adding fruit to this base mix, you can add more sweetener, I love making a fruit concentrate with fresh fruit and sugar and letting it sit out overnight. When I do that, I make individual containers and spoon in the “fruit on the bottom”. Peach is my favorite, strawberries are also quite lovely and of course, blueberry….I’ve made lemon yogurt, coffee, lemon with fresh raspberries, vanilla, plain, whipped…I eat this stuff everyday….. I make Lassis, frozen yogurt, I give it to my Pitbulls, Ginger & Izabel and they LOVE it. Raw Vegan Yogurt for everyone!!!

So go forth, make some badass vegan raw coconut yogurt, if you need supplies, Burning Heart carries the meat and the coconut blossom sugar if you would like to order some. If you have questions, don’t hesitate to ask me at HotYogaGrl@gmail.com, if I can answer them I will. Most importantly, love yourself up when you’re making this and think good thoughts….it truly is a powerful and healing bit of deliciousness, there is something miraculous about it…Let me know how it goes…..Peace Love and all that good stuff ❤


Advertisement

Water Kefir!

I am obsessed with all things fermented. I just recently woke up my kefir grains that were stored in the back of my fridge.  Pronounced KEE-FUR. I use to make it every couple of days- then I mastered kombucha which has a slower rhythm than kefir and just got into a comfortable pace….then I stopped drinking and my desire for beverages other than water crept up. Kombucha rolls around every 8-10 days and I have a pretty good rhythm going, when to make the brew while a finished brew is doing a 2nd ferment and I have cold kombucha in the fridge; kefir takes a short 2-3 days (!) and only a quick 2nd ferment, again about 1-2 days before its ready to go! I have been mixing mine with hibiscus tea, lemon juice, and drinking it on its own.

  • Water kefir is not the same as Dairy Kefir, it is also known as Tibicos and it is believed to have originated in Mexico.

Kefir is referred to as “grains” but they aren’t grains at all, but a living matrix of yeast and bacteria that look more like crystalline mini lumps. You can press them between your fingers and they will mush, I don’t know why you would want to do that, but that is the texture to them. I love these little guys. It has become such a pleasure to nurture them and to drink their gifts! They live off of sugar, so by the time they have eaten through the sugar in the water, mostly what is left is converted to glucose and fructose, and what you drink, has about as much sugar as one green apple. They are FILLED with healthy probiotics which helps promote a healthy belly. Water kefir is a fermented food that is easy to make and enjoy. You can also make an entirely sugar free non-dairy kefir drink by instead of using sugar water, you use raw, living coconut water and let that sit for a couple of days. The end result is almost a champagne like, mildly sweet, effervescent healing tonic!

Fermented foods are known for their anti-aging and cancer fighting properties. “Kefir also contains beneficial yeasts, such as Saccharomyces kefir, which can dominate, control and eliminate destructive pathogenic yeasts in the body. They do so by protecting the mucosal lining where unhealthy yeast and bacteria reside, forming an army that cleans up and strengthens your intestines.  The body becomes more efficient in resisting such pathogens as E. coli and intestinal parasites.” -www.tibicos.org

All it takes is about 48 hours before you are ready to enjoy your first batch of kefir.You can drink this liquid after straining out the grains (now ready for another fresh batch of sugar water) or you can opt to do a second ferment which creates more gas, creating a soda like drink. I love making mine fizzy, this happens by using an air tight bottle of some sort, like an italian swing top glass bottleGrolsch bottles or any hermetically sealed container. You can flavor it at this point with fruit juice, ,or fresh fruit, or with italian soda flavors- it really is like soda!  I find Water Kefir to be more accessible than kombucha initially but that could just be me.

You can’t grow kefir grains without having them! SO you either have to purchase them or be lucky enough to be given some. I am planning on having a kefir party soon but I am serious about my grains, don’t ask me for any unless you plan on committing to them! They are such a blessing!!!

The good news about kefir is that if you are not feeling it or start to get overwhelmed, you can put them in some sugar water and put them in the fridge for up to 3 weeks, where they will go to sleep (become less active) until you are ready to start them up again. Any longer than that, I would suggest dehydrating them.

What you will need to set up your Kefir Kitchen:

  • one or two 1 quart glass mason jars or bell jars (the grains don’t like metal and they shouldn’t ever come into contact with any stainless steel or other metal utensils)
  • 4-6 hermetically sealed bottles
  • fine mesh plastic strainers (get a set of several sizes)
  • sugar- they love sucanat but this makes for a heavier tasting brew, no honey (disinfectant qualities kills off the grains) no agave (low glycemic index), I use organic sugar, they LOVE it, it’s is really inexpensive, and makes a light tasting finished product.
  • cotton bandana- to cover the jar on the first ferment- the fermenting process needs air but the sugar water attracts ALL SORTS of critters, so you want to keep them from raiding your brew. (and yes those are SoulCycle Bandanas :> )
  • rubber band to secure the bandana around the lip of the jar.
  • one set of plastic measuring spoons

Basic Water Kefir:

1/4c water kefir grains

1/4 sugar

4c fresh water

1T dried fruit- I use Goji Berries and fresh ginger, but have tried figs (love), apricots, raisins (not a fan)- the grains LOVE dried fruit, and I notice it gets them more fizz lovin’ but it could just be me- you can choose leave them out entirely.

Dissolve the sugar in a clean glass mason jar- make sure that the water has cooled down if using warm/hot water to help dissolve the sugar crystals (don’t cook the kids!) Add in the grains, the dried fruit and cover with a clean cotton cloth and secure it with a rubber band. Let this sit in a place unmoved for 2 days away from direct sunlight…and on the 2nd day, get ready to rock your Kefir.

The grains will keep on keepin’ on as long as you care for them- feed them! If you notice your grains aren’t producing, or reproducing (which they will do and you get to be the revered sponsor to prospect-ful kefir makers of your choosing!), you can do a single feeding of molasses or sucanat, both of which are sugars with their minerals intact. This will give the grains a boost of nutrition, and then you can go back to your regular sugar water. Also adding a pinch of pink sea salt offers up perfect mineral nutrition.

I will post recipes as I make them. But one recipe to get you started is SO SIMPLE and probably my favorite…

Water Kefir Lemonade

4c 1st fermented water kefir (grains strained).

1/4c fresh lemon juice

Drink immediately! You can 2nd ferment the kefir after removing the grains for a couple of days and  then add the fresh lemon for a spikey, bubbly lemonade or fizzy Lemon soda!!!

THIS IS THHHHHEEEEEE BEST!!

Sundried Tomato & Ramp Cheese Spread

*sundried tomato & Ramp Cheese Spread

Seriously… NOT F*CKING AROUND….what a flavor on this cheese!!!! Ramps are only here for such a short time! What a way to celebrate their uniqueness and honor their presence. I had the opportunity to forage for ramps with my friend on her hillside- what a divine way to connect with the planet….spring has finally sprung.

Sundried Tomato & Ramp Cheese Spread

2c cashews, soaked for an hour (this step can be skipped)

1T mellow white miso

3 capsules vegan probiotics (empty powder and dispose of the capsule) or 1t powder

1/2c +up to 3T filtered water

2t onion powder

1/4c sundried tomatoes in oil- just the tomatoes, minced (I used Bionatura’s)

1/2t pink salt

1/4c coconut oil

3t lemon juice (omit if fresh is not available)

6 whole ramps, green & white minced

Step 1.

In a Vitamix or high-powered blender, add the cashews (drained if soaked), the probiotic powder, miso and 1/2c of water.

Blend this at a lower speed initially to well incorporate the contents, speed up the motor as it gets blended. You will need to process this for at least 4-5 minutes until the cashews are absolutely creamy. Scrape down the sides intermittently and be sure to get all possible ‘pieces’ of cashews blended into the mix. Add a T of water as needed if the mixture gets stuck. If you run this too fast, the contents will heat up, creating an oily mixture.

When totally creamy and smooth, remove to a glass or stainless steel bowl and set in a safe, warm place- I place mine in the dehydrator uncovered at about 100 degrees and let it run overnight. You could also in lieu of a dehydrator, place it in a warm spot in your kitchen, loosely covered. Leave this overnight or for 24 hours.

Step 2.

Mix in the salt, onion powder, sundried tomatoes, ramps, coconut oil (should be room temp and soft, not liquid), and lemon juice. Transfer to a container and place in the fridge for at least 6 hours to set, best, overnight. It becomes a beautiful, spreadable, creamy cheesy bit of awesomeness.

Kalamata Olive Cashew Cheese Spread- RAW, Fermented

kalamata olive cream cheese

Raw Kalamata Olive Cashew Cream Cheese Spread

This is a pro-biotic rich cheese! This would be AMAZING using pimento stuffed spanish olives! You could also add spices in like rosemary, basil, or fresh oregano- super delicious on bread, crackers , or with fresh veggies like celery dipped in.

1c raw cashews

1c raw sauerkraut (not pasteurized)

1T dulse flakes

1t raw agave or raw local honey

1 clove garlic

1/2t pink salt

3T of coconut oil

1T extra virgin olive oil

1/2c kalamata olives, divided

3-4T water- just enough to process until smooth- less is better!

Take 1/2 of the olives and mince with a sharp knife. Transfer and set aside in a mixing bowl.

In a blender, add in all of the ingredients, (including the other 1/2 of the olives) except the water and blend until totally creamy and smooth. Add the water as needed, 1T at a time. Pour into a jar with a locking lid (gasket, air sealed) and close it up.

Mix the minced olives into the cream cheese base. transfer to your container.

There should be at least 3 inches of space to give the cheese a chance to bloom. Label it, date it and place in a dark and warm place for 12-24 hours.

Transfer the jar into the refrigerator and allow to set up and cure for at least a week.

This is a pro-biotic rich cheese! This would be AMAZING with pimento stuffed spanish olives! You could also add spices in like rosemary, basil, or fresh oregano!

  • Delicious as a base for savory dips and spreads
  • Amazing spread on toast, bagels, and crackers