I can not get enough peanut butter lately so like any good vegan athlete, I have incorporated into my desserts! These are simple, and incredibly amazing.
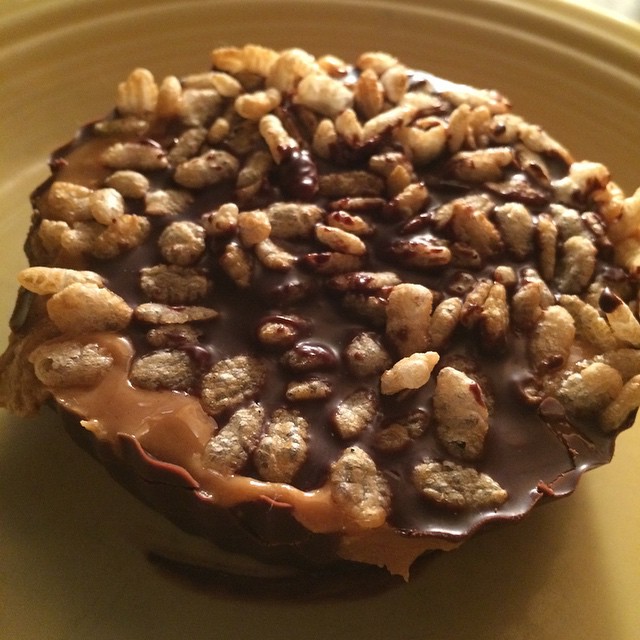
Peanut Butter Crack Cups
Makes 5 super large cups, about 30 mini
Chocolate Shell Coating:
1c vegan chocolate chips
2T coconut oil
Pinch pink salt
—
Peanut Butter Filling:
3/4c Organic natural, crunchy peanut butter
1/3c maple sugar- whizzed and powdered in the Vitamix
Pinch pink salt
—
1/3c brown rice krispy cereal
—
30 mini or 5-6 maxi cup cake liners
—

Over a double boiler, heat up water and place the chocolate chips and the coconut oil above. If you don’t have a double boiler, a pot of boiling water covered with a heat resistant bowl works perfectly. Melt the chocolate slowly over medium high heat. While the chocolate is melting, prepare your filling.
In a medium bowl, add in the peanut butter. If you haven’t done so already- put your maple or coconut sugar in the Vitamix and run the motor until the contents look powdery. Add this powder to the peanut butter, add the salt and mix well, until all of the sugar is well incorporated. Taste and if more salt is needed, add it.
On a plate, arrange your mini or maxi cupcake liners. For the maxi, spoon 1T of melted chocolate. For the minis’ about 1heaping t. Gently tap the chocolate to cover the bottom of the liner and work up the sides.
***only with the Maxis….Place this in the fridge or freezer to set, about 10-15 minutes***
—
After they are set, remove them from the fridge and spoon in the peanut butter filling (1T for maxi, 1t for minis’) Again, gently tap the filling to fill the liner.
***only with the Maxis….Place this in the fridge or freezer to set, about 10-15 minutes***
Repeat spooning the chocolate over the PB filling, same 1T or 1t, maxi, minis’.
Sprinkle in about 1T of rice cereal over the top of the cup, gently encouraging them to become a part of the chocolate topping, you can use a spoon if necessary but you want them to set up “in” the coating.
Let set for an hour at least, 2 is better.
THESE ARE INCREDIBLE.